Fotowiderstand am Arduino Uno: Unterschied zwischen den Versionen
(→Anschluß eines LDR (Fotowiderstand) an den Arduino) |
K (→Programm für den Arduino) |
||
| Zeile 18: | Zeile 18: | ||
<syntaxhighlight lang="Arduino"> | <syntaxhighlight lang="Arduino"> | ||
const int ledPin = 13; | const int ledPin = 13; | ||
| − | const int ldrPin = | + | const int ldrPin = A2; |
void setup() { | void setup() { | ||
Version vom 19. Februar 2018, 23:21 Uhr
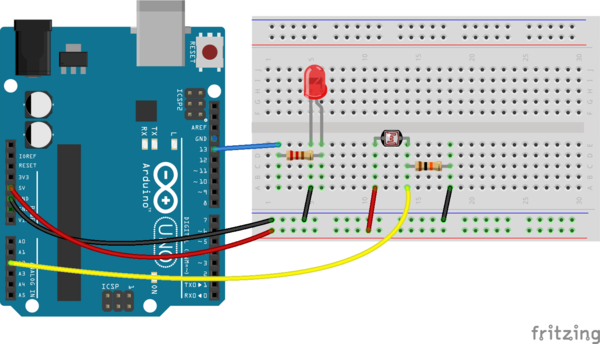
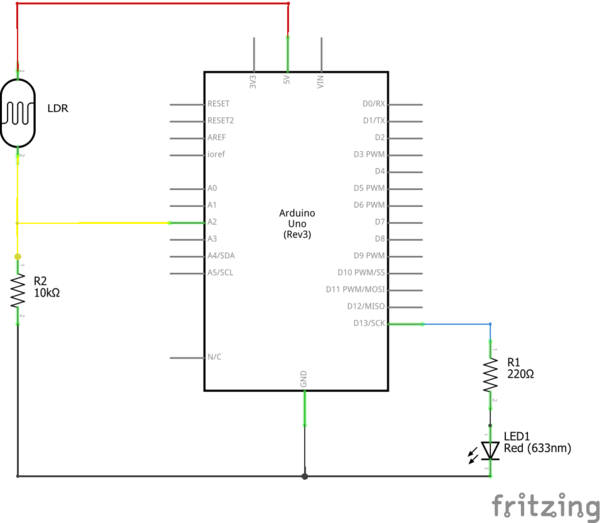
Anschluß eines LDR (Fotowiderstand) an den Arduino
Für den Anschluss eines Fotowiderstand an den Arduino wird folgendes benötigt:
- Arduino Board
- LDR Fotowiderstand
- [[Steckbrett}}
- 10 kOhm Widerstand
- LED Leuchtdiode
- 220 Ohm Widerstand.
Programm für den Arduino
const int ledPin = 13;
const int ldrPin = A2;

void setup() {
  Serial.begin(9600);
  pinMode(ledPin, OUTPUT);
  pinMode(ldrPin, INPUT);
}

void loop() {
  int ldrStatus = analogRead(ldrPin);

  if (ldrStatus <=300) {
    digitalWrite(ledPin, HIGH);
    Serial.println("LDR is DARK, LED is ON");
  }
  else {
    digitalWrite(ledPin, LOW);
    Serial.println("---------------");
  }
}
