Schrittmotor am Arduino: Unterschied zwischen den Versionen
| Zeile 3: | Zeile 3: | ||
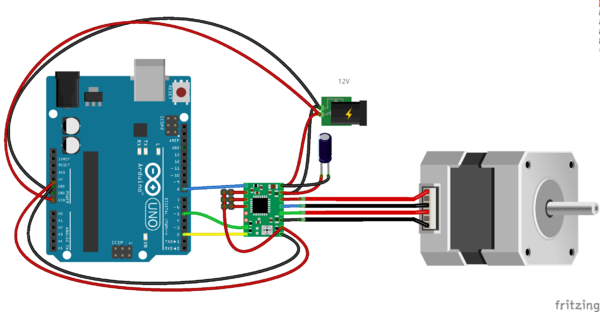
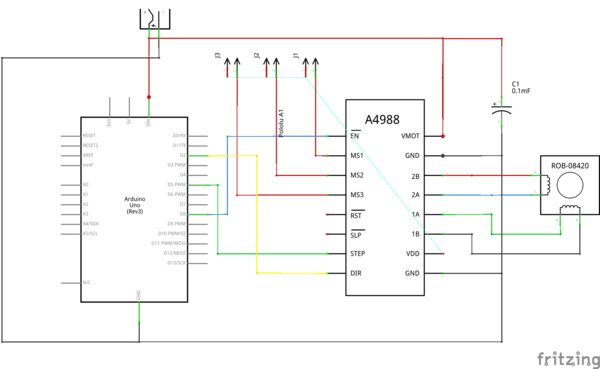
zum Anschluss des [[Schrittmotor]] an ein Arduino Board werden ein Schrittmotor Treiber und zwei I/O Pins benötigt. Der step Pin für die Schritte, hier wird jeweils ein HIGH LOW Impus je Schritt benötigt. Der dir Pin für die Richtung, je nach Pegel HIGH oder LOW, dreht der Schrittmotor in die eine oder andere Richtung. | zum Anschluss des [[Schrittmotor]] an ein Arduino Board werden ein Schrittmotor Treiber und zwei I/O Pins benötigt. Der step Pin für die Schritte, hier wird jeweils ein HIGH LOW Impus je Schritt benötigt. Der dir Pin für die Richtung, je nach Pegel HIGH oder LOW, dreht der Schrittmotor in die eine oder andere Richtung. | ||
| − | [[File:Stepper_wiring.png|600px| | + | [[File:Stepper_wiring.png|600px|Schrittmotor Verdrahtung]] |
| − | [[File:Stepper_schematic.png|600px| | + | [[File:Stepper_schematic.png|600px|Schrittmotor Schaltplan]] |
== Programm für den Arduino == | == Programm für den Arduino == | ||
Version vom 2. Februar 2020, 15:25 Uhr
Anschluss des Schrittmotors an den Arduino
zum Anschluss des Schrittmotor an ein Arduino Board werden ein Schrittmotor Treiber und zwei I/O Pins benötigt. Der step Pin für die Schritte, hier wird jeweils ein HIGH LOW Impus je Schritt benötigt. Der dir Pin für die Richtung, je nach Pegel HIGH oder LOW, dreht der Schrittmotor in die eine oder andere Richtung.
Programm für den Arduino
Das Arduino Demo Programm kommt ohne zusätzliche Library aus und steuert den Schrittmotor für jeweils 200 bis 1000 Schritte mit jeweiligem Richtungswechsel an. Bei Verwendung des Arduino Nano CNC-Shield wird der Schrittmotor der X-Achse angesteuert.
/*Example sketch to control a stepper motor with A4988 stepper motor driver and Arduino without a library. More info: https://www.makerguides.com */
// Define stepper motor connections and steps per revolution:
#define dirPin 2
#define stepPin 5
#define stepsPerRevolution 200

void setup() {
  // Declare pins as output:
  pinMode(stepPin, OUTPUT);
  pinMode(dirPin, OUTPUT);
}

void loop() {
  // Set the spinning direction clockwise:
  digitalWrite(dirPin, HIGH);
  // Spin the stepper motor 1 revolution slowly:
  for (int i = 0; i < stepsPerRevolution; i++) {
    // These four lines result in 1 step:
    digitalWrite(stepPin, HIGH);
    delayMicroseconds(2000);
    digitalWrite(stepPin, LOW);
    delayMicroseconds(2000);
  }
  delay(1000);
  // Set the spinning direction counterclockwise:
  digitalWrite(dirPin, LOW);
  // Spin the stepper motor 1 revolution quickly:
  for (int i = 0; i < stepsPerRevolution; i++) {
    // These four lines result in 1 step:
    digitalWrite(stepPin, HIGH);
    delayMicroseconds(1000);
    digitalWrite(stepPin, LOW);
    delayMicroseconds(1000);
  }
  delay(1000);
  // Set the spinning direction clockwise:
  digitalWrite(dirPin, HIGH);
  // Spin the stepper motor 5 revolutions fast:
  for (int i = 0; i < 5 * stepsPerRevolution; i++) {
    // These four lines result in 1 step:
    digitalWrite(stepPin, HIGH);
    delayMicroseconds(500);
    digitalWrite(stepPin, LOW);
    delayMicroseconds(500);
  }
  delay(1000);
  // Set the spinning direction counterclockwise:
  digitalWrite(dirPin, LOW);
  //Spin the stepper motor 5 revolutions fast:
  for (int i = 0; i < 5 * stepsPerRevolution; i++) {
    // These four lines result in 1 step:
    digitalWrite(stepPin, HIGH);
    delayMicroseconds(500);
    digitalWrite(stepPin, LOW);
    delayMicroseconds(500);
  }
  delay(1000);
}
Web Links
- Makerguides- A4988 Stepper Motor Driver Arduino Tutorial
- [ https://github.com/laurb9/StepperDriver Github - Stepper Driver Library]

